Powered By Blogger

A little blast from the past- the DISTANT past!

In light of my recent decision to play with my watercolours again, but to change to a more relaxed style, I thought I'd show you a few of my Botanicals done on our summer travels. I drew from life , lightly with pencil, inked with India Ink and a Crow Quill Mapping pen, and then painted. They were generally done in a day because next day, we were somewhere else.

Corn Poppies fron Kent, UK

All white bouquet painted from somewhere near home

I believe this is Anemone Nemorosa,but I'll check
to be sure.

Gathered and painted at Corral Creek, AB. (near Lake Louise)

Near Port l'Hébert, NS

Millbank SD

Up the mountains near Berchtesgaden Germany

Gathered and painted along the Pilgrims Way, Kent UK

From Beaver Harbour NS

Banff, AB

Lauterbrunnen Switzerland

Lunenburg NS

Kleine Scheidegg, Switzerland

Boughton Aluph, Kent
I hope you enjoy these! I certainly enjoyed doing them, despite my family's frustration ;-) If you have any questions, fire away!

Well,I've done it now!!

In a fit of ???- who knows what, I decided I'd try to update the look of my blog! I am sooooo upset! EVERYTHING I had before is GONE and even the magical folks at Apple can't help me :-( I guess THIS is what we're stuck with unless anyone out there in the Blogosphere knows how to restore my original???? I have been sick all weekend and should NEVER have tried to tackle this today.
This is an old quilt but I needed to give you summat to look at!
Dunno if I can do anything else. Maybe I need to round up a couple of ten year olds! They know everything. Anyway, please forgive the confusion folks. Hope to hear from you soon.

Sumac in Watercolour

I have started a little watercolour of a stand of bare winter sumac heads that I shot a couple of years ago. This is the first time I have used more than a scrap of paper so this is an adventure! I am trying hard to find the original photo so you can see what inspired me. So far, no success! It is THERE but I can't get it to move for me. I'll keep trying and add it if I can. ... and--- I FOUND it !


Meanwhile, I have started my wash for the background. The picture was shot with a very shallow depth of field so the background is pastel and blurry. There was snow on the ground too so it was pretty bright.

Sorry about the shadow but the sun was low and very bright- and I , for one- am NOT complaining!! 

You won't be able to see it here likely but there was what looked like a bit of dust in the blurry background sumac flower but when I tried to remove it, it was a little undissolved fleck of Alizarin Crimson paint!!!

You can see the little OOPS toward the top left corner!
Betcha you can see it NOW!! Ah , well, this was NOT destined for the National Gallery or the AGO so I'll try and work with it. I stood to apply the wash and I think it helped me. I also used one of my little natural sponges to quickly wet the paper. That worked well too. Once it is all good and dry, I'll start round TWO. Stay tuned!

Well....

Here is what comes of being all fired up impatient, unprepared, out of practice, tired, shaky - I could go on!!! I need to start back at the beginning and work out a colour chart. 25-30 years is a LONG time to remember the fine details. Turns out, in THIS case, that this is NOT like riding a bike!

This is NOT my best effort! To boot, the paint was still wet when I photographed this so it is warbly. I am NOT best pleased. Too much overwork. I SHOULD have remembered- make a decision , lay the colour in and LEAVE IT ALONE! Ah, well, Ms Haines says that we are "painting for the bin"! Never were truer words spoken. Anyway, I HAVE learned some things. Still DYING to get on with it but MUST slow down and redevelop skills first. I have to say though that having a brush in my hands again after so long away DOES feel great! Bear with me, Kind Folk.

In closing, I will NOT be doing architectural subjects again any time soon. My hands are just too jittery! That can work to one's advantage in botanical subjects :-) Come on, Spring!!

Exercise 2! Gotta do it before I start to quilt!!!


This is a START on Exercise 2- a portrait of an old Venetian Doorway. I am following Ms Haines' directions but adding my own touch to a degree. There is still quite a bit to do!
Well, I am well and truly hooked now and SHALL quilt the beech leaves but MUST try this watercolour exercise first. I must  confess, "though warned with quotations not to", I DID roughly sketch my Venetian door before beginning to apply paint!! I am still stuck in the "draw first, paint later" rut. Besides, I chose a pretty square piece of paper for this, although it is a vertical picture. Never mind! It is an EXERCISE.

So WHAT, I hear you asking, am I learning?? Well-
1- I am VERY timid
2- I am stuck in my ways
3- I DO need a MUCH better, bigger palette.( Curry's, my lovely local art store was VERY short on palettes and I got one that is just NOT wonderful at all)
4- I need to get MUCH freer in my use of colour. Jean Haines is GOOD for me. She'll get me loosened up.
5- I need to do some colour mixing exercises. I am a BIT rusty on which pigments are the best mixers.
6- Not a revelation to me but... I DO love to paint! It MAY be a revelation to YOU!
7- I need to choose a paper shape appropriate to my subject AND...
8- I REALLY need to loosen up!! I am VERY tense at the moment. [could it have anything to do with the bank giving us grief over Mum's estate??? SURELY not  ;-)]
9- I learned a fun, fascinating technique for creating texture. You work over WET paint and stretch a piece of Saran Wrap , shaping it with your fingers to what you want, place it over the wet paint and leave it there till it dries completely.
Here's the look of the Saran over wet paint. I used it to make "weathered boards" for my door! Pretty cool and I am pretty sure it could be refined with practice. Not one of those things you should OVER use but interesting, cool and effective in certain cases.
Stay tuned Dear Friends. There will be more to come. This is SUCH FUN! I forgot how much I love it!

First exercise- and, BOY!! do I need it!

I started the other day just messing with paint, water, brushes, paper but today- I took the plunge and tried the first exercise on using brushes effectively. I have never had issues with making a brush do what I want it to and I am pretty good at colour- but I have always been a nittery frittery painter- lots of detail, lots of pencil sketches and a careful drawing to work from. So... starting out in midair with NO guidelines was scary to say the least---and having little or NO detail in the final product....!!!!! Anyway, I have done Exercise 1, semi successfully - but at least it is a start. NO LAUGHING!!!
It is, in case you can't see it, a red brick arched bridge with trees on either side.  My bridge is not in the right proportion but I am at least pleased to have gotten my brushes to do what I want and enjoyed puddling about in the water !

The next exercise is on control- of brush, pigment and water. It is much simpler and then, we go on to a lovely old Venetian door. I'm excited to try that. I do not generally agree with copying but in this case, it is an excellent way ( and tried and true from the method of instruction used in the Old Days) to teach and to learn. Besides, I am NOT saying these are my original ideas. In fact, eventually, I will mark them as Ex,1,2,3 etc and NOT sign them. This is a Photo of the piece and the "signature" is merely the copyright that I use on my photos. There is no signature on the "painting"! 

Galloping right along!!!


Layered!!
Layered at last!! I am all ready to quilt now. BUT, WILL I start to quilt right away?? I think perhaps NOT! I have not done a lot of serious quilting for some time and I am RUSTY, so I shall sandwich up some junk fabric and batting and PRACTICE! I DO think that would be prudent.
You can't see the far right hand end but I have put a couple of wee twigs in to sort of "tie" this to something. Otherwise, it seemed floaty and disembodied. There WAS a little branch just barely visible in the photo but I have used a wee bit of artistic licence. Hope it is successful in the end!
So, now to choose thread colours and to decide HOW I want to quilt this. I am VERY into intense quilting of backgrounds . I like the way that makes the subject the centre of attention. Stay tuned :-)

And now for a blast from the VERY DISTANT past! 
Here am I in perhaps February or early March of 1952, JUST turned nine and recovering from a very serious bout of viral pneumonia. I got sick and was hospitalized in late 1951, just before Christmas and while I was in there, Mum and Dad, my Granny Morris and new baby sister all moved to a new house in Burlington. EVERYTHING changed! Look at the DANDY haircut!! I entered hospital with two long, fat braids and NO BANGS but the nurses had too much trouble handling all that hair- SO THEY CUT IT SHORT!!!!Can you imagine the furor today???

Anyway, I am posting this to show that what appears as a sudden interest in painting, is- in fact- a long standing passion. I stopped painting several years ago and gave DD all of my paints etc. She has made splendid use of them and now, with rekindled passion, I have been purchasing paints, brushes and soon- decent Watercolour paper. This is just a wee warning that Rtquilter may soon appear to be Rtpainter? We'll see. Maybe it is NOT like riding a bicycle! Maybe I have lost my abilities. I am surely game to try anyway!!

On turning 75!!!

Tomorrow is my 75th birthday! How the heck did THAT happen?? I am NOT whining, BELIEVE me! I am VERY fortunate to be here and well and happily married with wonderful family and friends-  but I ask again... HOW DID THIS HAPPEN?????

You know I lost my Darling Mum last November and I admit to being in a bit of a funk since then . I don't think there is anything wrong with that but I did NOT like the feeling. I have had two nicknames since I was little- Starch and Carolina Sunshine.( cute, eh!!) I have not had much sunshine about me recently and I have NOT had much motivation to be creative. Besides that, I have had two surgeries on my right hand as many of you know, and I have not been up for the torture of hand work until very recently.

Well, I started on finishing the Beech Quilt and this afternoon, FINALLY settled on a background fabric that made me pretty happy! I have been using my little Canon camera to shoot these pics and
I fear that it MAY be dying ! The colour intensity is WAAYY off here but perhaps you get the idea. Maybe I can get a better shot tomorrow. I'll try! Anyway, here it is...


I am reasonably happy with it and , in real life, I think it looks better- not such high colour.

Now, what caused this sudden rush of MOJO?? Well,  I have been following a pair of Englishwomen, sisters, artists  from Cornwall and something touched a nerve! One sister, Evelyn Flint, has been working on teaching herself to paint in watercolours using a beautiful book by Jean Haines called Atmospheric Watercolour. Ms Haines has  number of books on watercolour and I ordered the Atmospheric one- and have not put it down since it arrived!

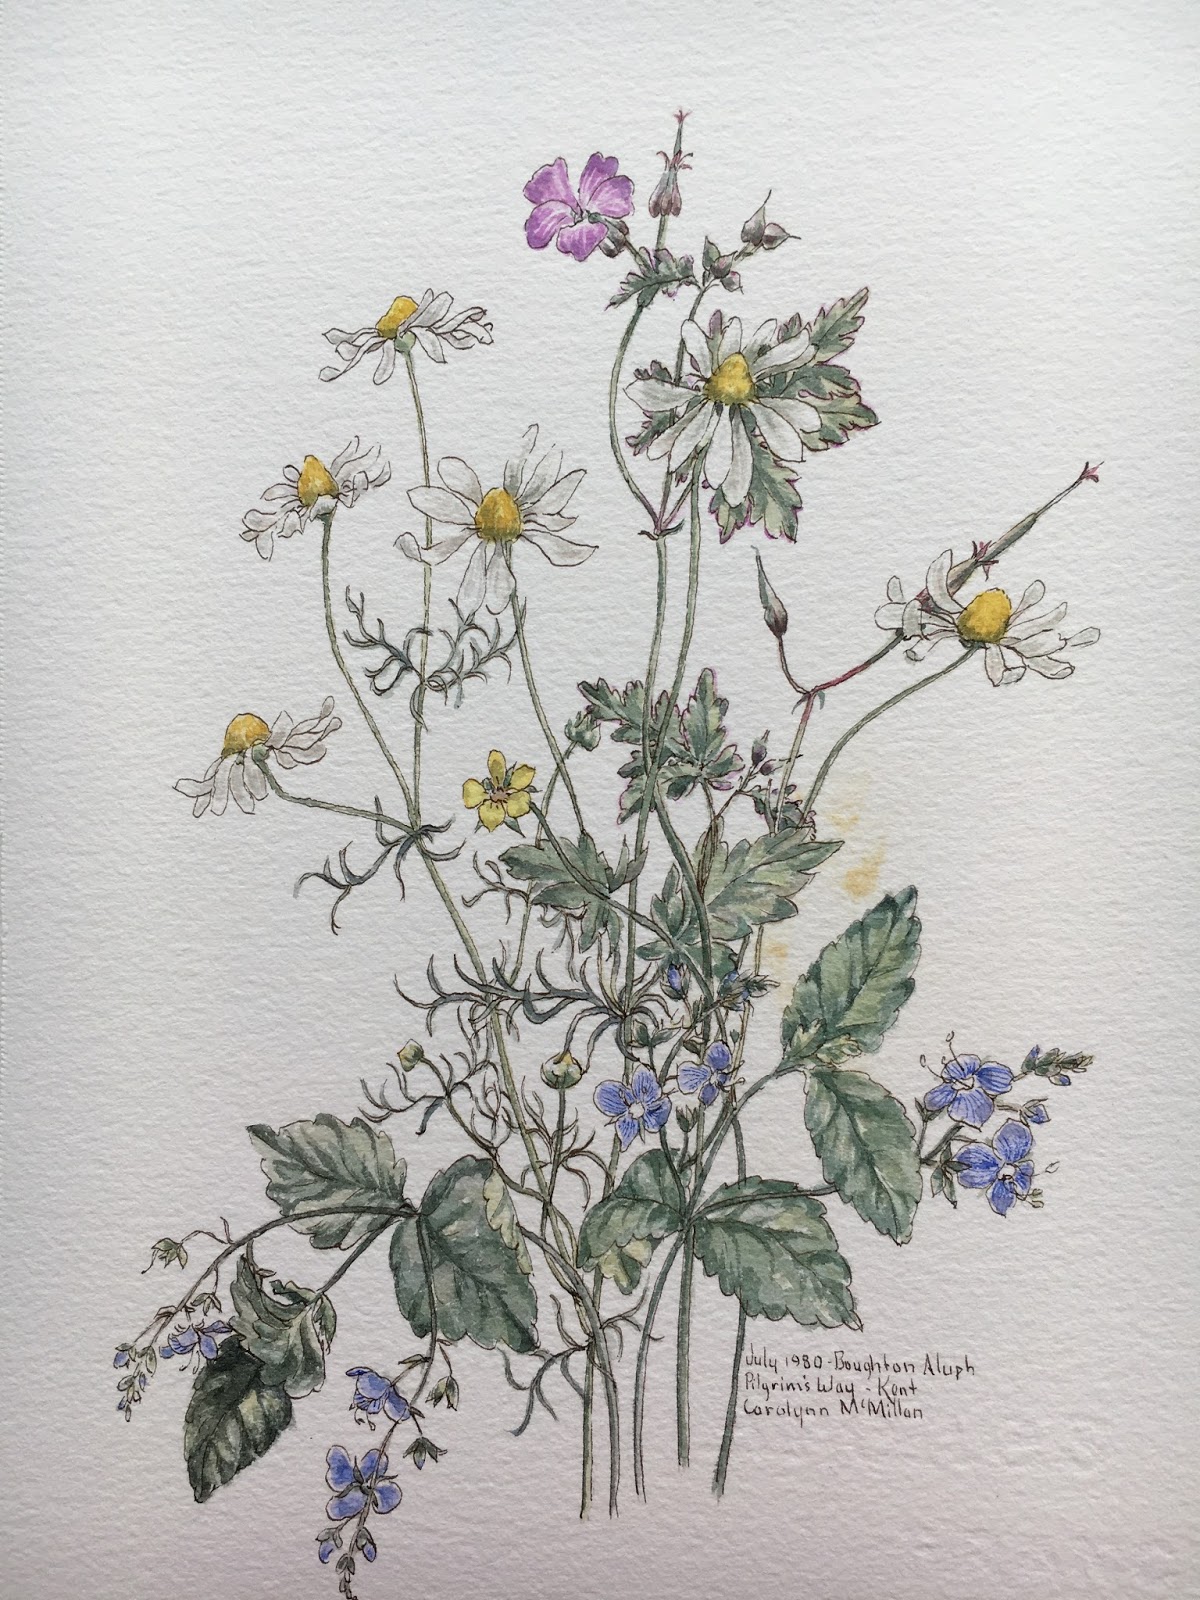
I have painted, mostly watercolour botanicals ( are ya surprised??) forever but not recently. In fact, I gave my paints AND brushes to my Darling Daughter and she is doing wonderful things with that stuff. Well... I got so inspired that I went out and bought NEW paints, paper and NOW, I need a nice big brush! Alas, sable ones are pretty rare these days as there is an international ban on cruelty to animals. (I am glad of that but sad about the brushes)

I KNOW how to paint but Jean Haines' free, unfettered style REALLY appeals to me and I have begun working my way through her exercises just to get the feel of the brush, the paints, the water, the paper and how much of everything to use. I always worked with half pans but have bought tubes of paint this time.

This is NOT art that I am showing  you here. It is just fun, messing about, getting a feel for watercolour again.
Just fooling around- but it feels sooo good!

I was playing around with colour...

...water

Just messing!

It is nothing but COULD be a sky or water or a bed of flowers...

I am just amazed at how different I feel . Last night, I did NOT want to go to bed! I was all set to hit the diningroom table with paper and paint and paint all night. Have not felt THAT way for a LONG time! If this is what my dotage is all about, bring it on!! I am giving notice right here, right NOW, that I may be OLD, but I have NO intention of giving up and ACTING old! I have had the biscuit with wasting time! You heard it first here... as long as my energy and health hold out, I shall be BUSY!! And I shall be ENJOYING it!


I hope you are all well  and enjoying a lovely weekend. I promise to desist with the ranting!!! Thanks for your patience! 

Just the T's to cross and the i's to dot...

I am calling this done and ready to finish now but still want to do a few colour and shadow tweaks  first. I MAY make more of the branch visible too. This is all attached now by fusing the bits where the leaves meet.

All done but the details


Have a look at the earlier posts to see the full progress! I HOPE to send this to the needleandthreadnetwork.blogspot.com.

Check out the other posts there this week!

THOUGHT the leaves were done!

... but I shot pics of them as I went along looking to see how the colours work together - or not , and found the LAST leaf NOT to be right, according to my old eyes.


Actually, here, the last leaf does not look TOO bad but it is NOT what I wanted- so THREE iterations later.....
I have a new one that I like better.

The colours do not look vastly different here but , BELIEVE me, they are. Soooo....

This is the version of THAT leaf I will keep and use but now, I do NOT like that purple patch in the top centre leaf, so it is OUTTA here ASAP as is that pinky highlight on the top right leaf. In the end, it DOES pay to be picky! I am suffering from NOT making dedicated fabrics  in the first place. I am working with my ratty stash, mostly successfully but not always. Bear with me please and I will repost later when I have made my little branch and some fat, pointy, shiny buds.

Off to rid the leaves of unwanted patches of "what was I thinking" colours!!

Good progress!!!

Yay! I am getting on like a house on fire! I have worked HARD all day long and here is the result!

Here is where I started out early this morning. We had a few more inches of wet, heavy snow overnight so we decided not to do our regular Monday shop.We'll go tomorrow instead. This gave me a WHOLE day to work on this. I believe, in truth, that the centre single leaf with the two patches of shadow was done mid morning.

By suppertime tonight, here's where I stopped! ONE more leaf to go. Then, I have bits of the branch and five or six shiny, rusty red, pointy buds to make. At that point, the branch will be done except for the odd wee tweak.

THEN, I have to play with background colours. If you look at the original photo, there is lovely bokeh and light. I am playing in my head with how to give this impression on a piece of dyed cotton. I am still toying with painting the dye on as I did for my Poppies Aglow I and II.

I SHALL finish up the last leaf tonight. Looking forward to doing it. It is a pretty leaf! Stay tuned Folkses! I may finish the branch tomorrow . If it turns out nicely, I will submit it to Fibre Content for their consideration and see if they like it. Now, though, I bid you adieu and retire to the diningroom table to build one more leaf!!

In response to a question of construction

I have put this post together in response to a question about how I do this by a very kind Flickr Friend. At the risk of boring you stiff, here is how I make a multicoloured leaf.
This was where I was earlier this afternoon when I decided to try to log the steps in making a leaf.

My Flickr Friend didn't know if I had painted these or if they were made of fabric so I shot a closeup. If you look in the bottom right corner of this photo, you'll see leaf number three. That is the one I will make as a demo.
Step one involves tracing a pattern piece on top of my enlarged cartoon on a piece of Freezer Paper. For the non crafty types, Freezer Paper is paper on one side and a waxy surface that melts when heated, allowing you to stick it onto something to make a pattern, on the back side. You can see through it reasonably well so I just cut a bit of FP big enough to cover the shape I want and I trace over it with a PERMANENT marker on the PAPER side.
Here is my pattern ready to choose the base fabric for my leaf.
I looked through my fabrics to find a darkish brown, nicely mottled for the major part of this leaf.
Here's what I chose. Remember that my background will likely be fairly dark so I want shady but lively browns and not REALLY dark.
Now, with the waxy side down on the fabric, a good warm press with a heavy iron will make the pattern adhere to the fabric. If you were using a print fabric- you'd iron the pattern to the RIGHT side of the fabric. As this is dyed, pick the side you like best and use that as your "right side".
Now, you cut away the excess fabric with scissors. You do not have to cut TOO neatly. A bit of extra around the edges is good at this point.
Next, I cut my fusible material, in this case, Wonder Under. It has paper on both sides and it is WONDERFUL!
Just place your pattern down on the concave curl of the WU and snip around the pattern leaving a bit of a border.
Then, lift the pattern off the WU and remove the TOP paper of the WU. It should come away with no stickum on it! The remaining bit will have paper on the back side and will be sticky on TOP.

The WU is separated here and ready to heat fuse the pattern and fabric 
Centre the pattern on the WU and carefully flip it over . Then PRESS ( not iron) by pressing down on your hot iron until the fabric and WU are stuck together. Doesn't take long!
Now CAREFULLY trim the edges of the pattern along the lines you've drawn. 
At this point, you have a brown cotton leaf shape with a FP pattern fused on top and WU fused under it. You'll see some little patches with dotted lines around them. These are my sunny highlights or deep shadows. Once the pattern is cut out neatly, lift the areas of FP where those patches occur and carefully cut them away from the main pattern REMEMBERING NOT TO CUT THE FABRIC UNDERNEATH!
Like this. I did not mention - but will here -that BEFORE you cut the patches away, make some little registration marks across the cutting line so you can match up the patch and the original spot on the pattern.
Now, in this case, I have three tiny patch pieces and need to choose fabric for them, cut and apply WU to the back sides and then.....
Repeat the whole method for these wee patches  and then...
Put the different patches back into position carefully with the protective paper removed from the back of the WU on the patches. They will now be fused to the background fabric of the leaf. NB, HERE you can see the little registration marks I have made- little squiggles, two or three little lines.
Now you can use a tiny  VERY SHARP pair of scissors and cut the veins away carefully. Then, the paper pattern can be removed- equally carefully
At this point, choose a darker under fabric to make the dark veins. Now remove the backing paper from the leaf so you can fuse it to the darker under fabric.
Carefully arrange the leaf on the backing fabric and PRESS carefully

Add a layer of WU on the very back of the leaf, fuse, trim and remove the paper backing. Now you have a nice little fairly realistic looking leaf ready to fuse into your quilt design.
And here you see the finished product, leaf #2 , with its "friends" ready to be part of this little quilt.
Sometimes, if I have a VERY complex piece, I will retrace the pattern on a fresh piece of FP , cut it out and use that to do the last few steps .

I think , after this, that I will take a breather now, have my tea and wish you all good evening. I hope this is comprehensible. If not, please ask. I have ( almost) no secrets!!