Powered By Blogger
Showing posts with label Reemay. Show all posts

Background Information

This took me a long time! I tried it on black and it was fine , but not cool. So, I tried hand dyes and chose this one. I see leaves and organic shapes so I thought it "said something". It is now fused in place and a few bits of the red painted Reemay to suggest more leaves . Now- I start to stitch, and stitch --- and STITCH! I am linking it to the needleandthreadnetwork.blogspot.com

Making good progress

I had a busy night last night. I managed to start the fill-in process and finished it this morning- at least on the main piece. I dyed some really nice antique mustardy greeny gold pieces yesterday- and they were too blah! Great colours but they may get overdyed to spice them up! In the end, I used pieces from my hand dyed stash to better effect- or I think so anyway. Here are a few pictures of the process to date. I have lots of touchup I want to do once the main piece is completed. There need to be some shadows and highlights to lift and separate the leaves from each other. Sounds like that old bra ad from years ago! " Suddenly, you're shaplier!" Way to go ;-)
Sorry about the mess! I was working on my acrylic painting sheet on top of the light box so all of my housekeeping sins are obvious :-(

Front side of the previous picture. The long stringy bit on the lower right is another piece that I may add later.

And here is the partly filled main piece on my black display board. What am I going to do for a background? The black is dramatic for sure, but so predictable! Hmmm!!


And, finally, the whole piece filled and ready for the details and the extra little bits to be added. Still no idea what to use for background.

Long time since the Last Post!

It has been a busy week and promises more for the next while. However, I have finished the Reflections piece and have started another - with Reemay again! We visited St Jacob's last weekend to see Elaine Quehl's lovely exhibition and the town was almost as attractive as Elaine's quilts! There were huge tubs of foliage and flowers everywhere. Looking at then, one would NEVER suspect that southern Ontario had had such a dry summer. Maybe the PEOPLE of St Jacobs have been thirsty, because the plants in those tubs certainly were not suffering! I got some lovely , colourful pictures of the spectacular coleus leaves. That inspired me to start a new little quilt . Here goes!

Stunning colour, no? These were fabulous.

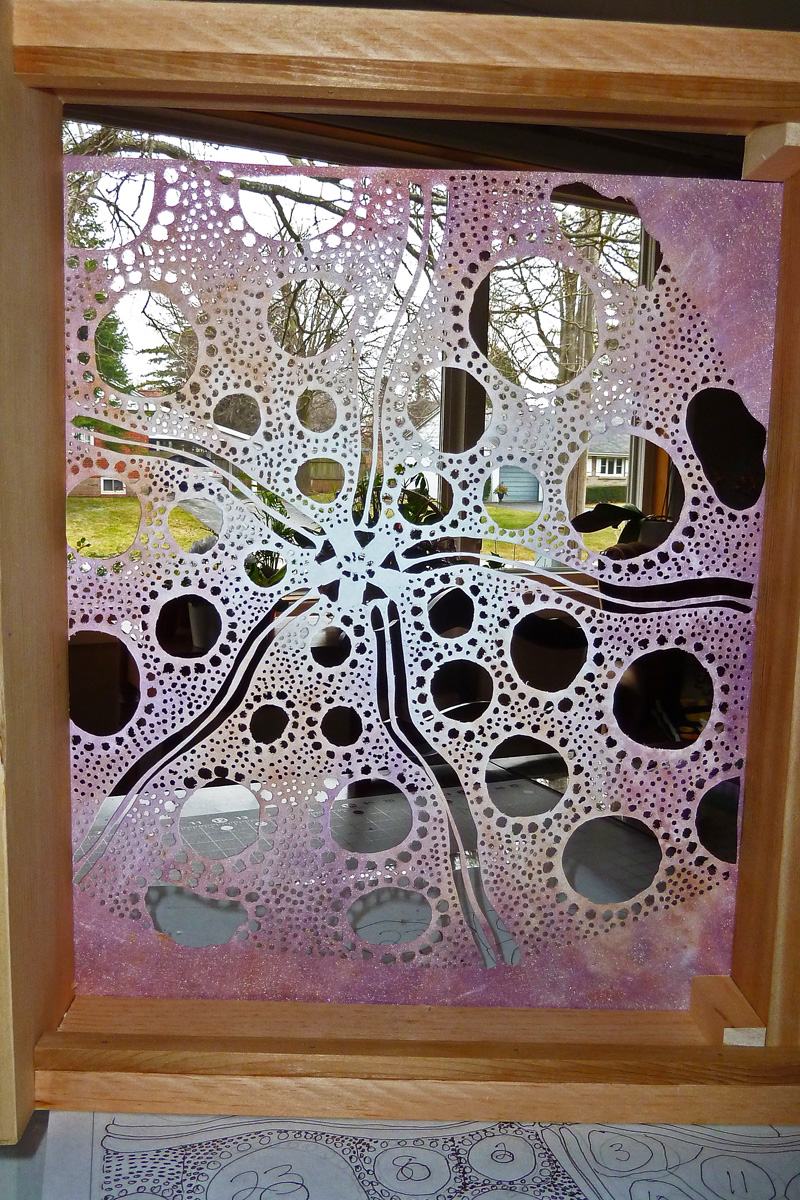
Here is my Reemay mask in progress. I drew the pattern, had it enlarged at the printer's and then traced the pattern onto the back of my Reemay. Once the whole pattern was in place, I covered the back side with Wonder Under. Then, with the aid of my trusty soldering iron, I started to cut-  and cut----- and CUT! VERY tired, sore back last night! BTW, the kitchen light fixture is reflected on the glass I was working on!

The cut out mask and my working photo


Mask all cut out, I put it onto a sheet of acrylic and went to town with Setacolor paints and Dye Na Flo

Not in very good focus, but here is the mask drying before I continue. I will do more detail once the paints have dried.
Now, it is time for a walk. It is crisp and breezy - but our sunshine has disappeared. Ah, well, nae problem!
Next job, dye some fabrics for the background and do another couple of smaller masks. Stay tuned!

I am going to post this to needleandthreadnetwork.blogspot.com. There will be lots of interesting things to see there. Drop by for a visit!

Done and dusted at last

I am calling this the Wall of Wierd- because all of the little pieces here have odd, interesting , mostly industrial fabrics in them . NOT very Trad!

I finally finished the little Alien Critter and really enjoyed doing it. It is bound and backed by a glorious fabric by Caryl Bryer Fallert from her Ombre Stripe collection- delicious! I put some commercially dyed "batik" on the back. Funny little piece- about 18" x20".Here he is  in a starring role...
Pity the colours are not TOO accurate. However, you get the idea.


                                                                              Next?........

Alien Entity!!

Alien Entity!
Look what this has morphed into over night!I have been adding these little spiky tentacles to some of my Zentangles and as this piece started out as a Zentangle... I like it!It may not have general appeal. The public at large may be a little freaked out, but I LIKE it! I was very glad that this piece of doll stocking striped fabric was big enough to do what I wanted. I am continuing with the quilting and thread painting and we shall see what befalls tonight :-)

Spikes on a serpent shape
Thinking of the Tomato Hornworm!

Little sea creatures
                                      You get the picture! My imagination is having a play day:-)
Later the same day. Started some quilting a la Zentangle.

Neat back side, eh!This is for Penny who loves backs- if she sees it!

...and another part of the back- just for fun. I like backs too.

Zentangle piece

Silk for the reemay. Wish I had intensified the blue.

The reemay just sitting on top of the silk. Love the colours so far.
Well, I have painted a piece of silk for the background and fused the reemay to it . So far, so good. Now, I am sitting, staring at this trying to decide where I want to go from here??? Do I want to cut the centre out and fuse it to a backing or do I want to keep this whole thing intact and border it with something? I have it sitting on a piece of batting and am tempted to quilt it soon . Maybe that would help me decide. What to do? What to do??
The two parts fused together. This is pretty light weight Habotai silk( 12mm). Maybe Dupioni or a heavier Habotai would have been more stable. I just got a piece of 16mm today . It has nice heft so prehaps it would not have wrinkled like this has . Not a major problem, but it bugs me a little. However, once it is stitched and quilted I am sure it will be fine.I used Trans Web on the back of the reemay. Not sure I love that product!
             I have posted this on The Needle and Thread Network.Click on the link on the sidebar.

Redo

I decided, after much anguish, that I did NOT like the way I had finished the Urchin, so, one last time, here he is FINISHED!! No more tweaks. I am done!  Fini!
Remounted and FINI
I also added some little metal beads to the bare, empty spots to suggest sand grains. These are gorgeous little beads, faceted pewtery coloured and very sparkly in a delicate sort of way, given to me by a very kind friend!
Little metal faceted beads added to the bare spots and out onto the binding

Bottom left hand corner
I am a MUCH happier camper :-)

Zentangle piece

I am having a ball with Zentangles and have cut this piece of painted reemay that makes me think of some of the Tangles I have been making lately. This is NOT the background but I needed something to show up the cut out reemay piece. This is moving right along but I need to make a background for it. That will take some time .I also hope to make the crossing Tangle lines go over and under each other . I am thinking I could use a marker to do some interesting shading. We shall see. Drop in from time to time and see how it goes.

I am still debating about removing the background of the Sea Urchin. I am not totally pleased with it. Maybe I will just finish the Urchin himself. Once again, stay tuned - and prepare to be amazed..... or not ?

A new experiment


My original drawing coloured with pencil crayons
I am at it again ! Still playing with reemay. This time, I have actually followed the directions given by Betty Busby. I painted the reemay, ironed it to shrink it slightly then fused Trans Web onto the back side of it. That part is now set aside while I transfer my drawing onto the back of the reemay using my light table. Once that is done, the reemay will be pinned back onto the little wooden frame for burning. I plan to burn it so that the lines end up a  bit wider than they are in the coloured drawing. I want the intricacy of the drawn shape but more reemay to show off the colour transitions. Wish me luck. I am also trying to shake out of the conservative use of colour that seems to be me at the moment! I have said before that I am a colour junkie, but lately, you would never know it. Maybe I am in my pastel period!!
Black and white , enlarged photocopy of my drawing

The painted reemay
Wish me luck.

Nearing finished

The beading is all done now

A few closer looks at the detail


Still raggedy edges but now it wants to be bound and mounted nicely
I THINK I am going to put the whole thing on another piece of fabric with batting. It has been a proper WIP as I have kind of had to make it up as I go. I DO know what I want and where I want to go, but I am still altering as I go along. Maybe it will be done by tomorrow ?
I am linked to the Needle and Thread Network with this one.

And still that Urchin

I have chosen a background from my hand dyed fabrics. I have decided on a treatment for the "holes" and I have done the stitching, and attached the background and the urchin mask and now, am working on beading the almost finished piece. Some photos of the continuing process.....
This looks messy but I was working out what I wanted to do with the "holes".

Chose a background fabric
The background fabric. I was planning to dye some silk for this but liked this piece. The fillins for the holes have been free motion stitched.


Mask and background attached to each other and free motion stitched

Detail of the stitching. I really like the fly stitch along the ribs. Stroke of genius!

This should be called "the story so far" but I am actually well past this - no pictures yet!

More Reemay!

The start of a new project. This is a piece of Reemay painted with Setacolor and Lumiere paints.It takes a LONG time to dry so I did it before drawing the pattern I wanted.

My pattern drawn roughly with a little detail onto a piece of freezer paper

The pattern has been taped upside down onto my lovely light box and the light turned on


Now the Reemay has been turned upside down and taped onto the freezer paper and the lines traced.

Pattern all traced in a fine , permanent marker onto the Reemay. Now I am ready to burn the pattern into the Reemay.

Nice little "monoprint" on the Reemay. I saw it on my craft sheet when I lifted the wet Reemay so I just carefully dropped it back onto the blobs of paint and, voila! Love the effect , but , alas when I burn the pattern , much of it will be lost. I will remember how pretty it was though!

All of the little holes have been burned into the Reemay.

The right side has to be tidied up to get rid of the " hanging chads"! Remember them???

This is the wrong side all ready to burn the bigger bits.

Now, I numbered the holes on the pattern....

....and numbered the Reemay holes to match .( stay tuned!)

Starting to remove the bigger pieces.

All finished with the major burning/cutting.

Wrong side again, all done!

Well , folks, this has been a labour of love! That's a lotta burning! On the whole, I am pleased so far. "What the heck is it ?", I hear you cry! It is a fanciful rendering of the fossilized skeleton of an ancient echinoderm, a Sea Urchin!
Next step, dye and /or paint an under layer which I shall quilt before adding the Reemay layer back on top. Enough for one day, I think!