Powered By Blogger
Showing posts with label hand dyed fabrics. Show all posts

As promised


Here is my next endeavour- my Aunty's glorious hydrangea! Are these not colours to die for!! Well, at least they were colours to START dyeing- for making this quilt:-)

I spent much of yesterday testing and recording colours, came up with a palette of colours and started dyeing. Here is where I am to date.
A few pieces for this quilt , including the test piece where I dropped my colours. It was intended as a throwaway, but LOOK at it!

The photo, the pattern and the fabrics so far.


Just a different view including the graduated piece. More on it later.
I have recently purchased a DVD and book by Ann Johnston, American Art Quilter and Dyer of note. VERY exciting and informative. Both are called "Color By Accident". In her DVD , Ann shows how to dye a solid piece of fabric with graduated colour(s) , either one colour from palest pastel through to a nice intense colour, or by blending one colour into another or others. VERY useful!! I used a pale Ecru enhanced by Golden Brown, fading out to a combo of Lilac, Wisteria and Violet. Sadly, I forgot to use the soda ash BEFORE adding the colour but , in a stroke of brilliance, I put soda ash into a spray bottle and SOAKED the piece before allowing it to dry flat on the table. The whole piece was wet, smoothed onto my dye table and then colour spread around by gloved hand. I have not pulled it out flat to show you but have folded it carefully so you can see the gradations of colour. The colours are very pastel so it is hard to photograph out full.


This is sort of a boring series of pictures but I have shown you both sides and both ends by folding and turning it all over. COOL, eh!
Now I will do another series , same kinds of colours but deeper values and another deeper graduated one more along the brown to violet line. It will be a fairly large piece, 24 inches along the short side, so it will take a fair bit of fabric in many colours and values. Most of the pieces here are fat quarters. The grad piece is about half a metre wide by the width of the fabric.

Tomorrow, I plan to post this to the needleandthreadnetwork.blogspot.com. It is only Monday now, so ... Maybe by then I will have more pieces to add.

And- I DO!! I have started a new batch, sort of mid value colours for this same project.
Here is a new graduated piece still lying wet on the table. I DID remember to use the soda ash FIRST!!

My table slopes a little, like a mortuary slab!! ....

...so... the dye runs and drips off the plastic cover into a basin full of old newspaper. This will stay here for a couple more hours before I rinse and dry it.
The remaining eight  fat quarters batching on the dryer.
OK, NOW when the time is right, I shall post to WIP Wednesday! Enjoy this week's posts.


Enoki

I am fond of grocery stores! I am particularly fond of fruit and vegetable markets. When my daughter and I used to shop together she despaired of my always having my camera in my purse and snapping pictures of the produce. She KNEW the picture would end up in a sketchbook or a quilt some time. Well, look what I found a few weeks ago! Is this not a stunning design !!
They are , as you can see, tiny Enoki mushrooms. I have never tasted them but they fascinate me nonetheless- fascinating fungi! I have finally finished the little mini quilt for the SAQA auction and sent it off on its merry way this afternoon :-( ( I liked that little piece!) and , although I thought I was done with mini, here I am again. I painted some Evolon the other night to use for the fungi and found a piece of nice mottled hand dyed fabric to use as the background. Here is where I am now...
I have cut the enoki out after drawing them on the back side of the Evolon on the paper from the Steam a Seam that I fused onto the back first. I now have fusible fungi!! I used a brown fabric marker to separate the individual mushrooms and will now paint in the detail, the highlights and shadows and then stitch around the mushrooms and then do the rest of the quilting. I THINK I can pull this off??? Stay tuned. I have to experiment with the paint and decide if I should fuse the fusible fungi first or paint first, fuse later. As I said earlier, stay tuned! Did I mention how much I love the look of these fun little fungi?
I will post this to the needleandthreadnetwork.blogspot.com  It looks like the start of an interesting week there. Drop in and see what is going on and add your WIPs!

Ready to quilt number two

I have finished the Lunaria pods now , except for a label. Today, I finished the Honeysuckle berries to the point of layering and quilting. I think I LIKE it! I am calling it Chiaroscuro because of the dramatic spotlighting of the fruits and those few remaining leaves. I am VERY pleased with the fabrics. I finally feel like I have a bit of a stash to choose from now. Hurrah!
This is not trimmed yet, not layered and obviously, not quilted  but to date, I am happy. I still have to figure how I want to put the blossom ends and shiny little highlights on these jewel-like fruits- (remember the photo?) The quilting will really lift it off the page- it says here! I have looked for a finished picture of the Lunaria quilting but seem not to have one so I shall take one after dinner and add it to the post. I like the quilting I did. I sound awfully pleased with myself! Sorry. I am NOT but I am pleased with certain aspects of my work this week so far.

And now, DH is making M'ungry noises so I am off to feed the inner beast!

Here is a bad picture of the finished Lunaria pods. The light was poor so the pictures are kind of dark.Maybe better ones tomorrow in the daylight? This one is crooked too because I was hurrying. Excuses, excuses!


I am posting this to the  needleandthreadnetwork.blogspot.com.
Have a look at what everyone is working on this week!


New Hand Dyes

I have been dyeing all of my own fabrics lately but in a sort of hit and miss fashion. I decided the colours I needed for a certain project and tried to dye to order. DUMB idea! Anyway, over the past few days, since finishing the Red Iris ( posted earlier) I have been making a concerted effort to do some serious dyeing in a more orderly manner and to end up with a good variety of colours and values. To that end, I have been ordering dyes from G&S Dyes in Markham, ON and from Pro Chemical and Dye in MA , USA. YUMMY!!!I have some delicious colours now and am having a major ball. Here is some of what I have been doing.
A nice lively dark made with Chocolate, Eggplant and Warm Brown

The darks so far- not TOO dark!

The lights and mediums with an emphasis on greens .

The greens alone.

I am currently working on some new colours . I cannot WAIT to see how they turn out. 
I will post this to the needleandthreadnetwork.blogspot.com  Drop in there and see what is in progress this week!I will post the new colours when they are finished later tonight. 

The pretty, The practical and the ZOWIE !

A few days ago, I treated myself to a bunch of five little tight budded bright yellow tulips. I have really enjoyed them. I LOVE tulips. I love the sound tulips make- go figure! Have you never noticed that when tulips are moved against each other , as in while they are being arranged in a vase, that they make a lovely little hollow, squeaky, popping sound as they rub against each other? Well, I have - because that is the kind of a strange woman I am! Anyway, these buds opened up and I noticed, to my great delight , that there was a tiny, fine red line around each petal. As the blooms opened, that red bled down into the yellow, eventually turning the yellow tulips coral-y orange. LOVELY As they opened further, I saw that beautiful slatey blue star shape in the base and the stamens were bright orange! LOVE IT! I could help myself no further. I had to take a few pictures to share. Here are a couple ...


 Now, the practical-I am finally finished the Red Iris and have used the wonderful instructions on Elaine Quehl's blog to create a strip facing. This is not a great photo but it DOES illustrate the finished product. The hanging sleeve is in place too as you can see. All it needs now is a good label.


And , finally- the ZOWIE part! I ordered some dyes from Pro Chemical and Dye and they arrived on Friday AM. One of the colours is called Eggplant! LOVE that colour- not so keen on the taste, but I took the dyes down to my subterranean dye shop and wet a piece of paper towelling and then opened one of the little pots of dye powder to try the colour. I dipped a tiny brush into it and just sprinkled the powder over a spot on the wet towel. INSTANTLY , the gorgeous Eggplant purple bloomed- but then-
because it is a mixed colour, and the component parts of mixed colours strike at different rates, began to travel!!!! I was VERY VERY excited, ran upstairs for the camera and here is the result!


Look at THAT! I say Zowie! Cannot WAIT to try it on cotton. That is it for today. Now I am off to adjust the white balance on my camera so I can get more accurate pics of my quilts. Enjoy the rest of the day :-)

Basics finished- almost

I worked all day yesterday and all day today and my back is killing me . The dining room table really is too low but it is all I have. I have the basic red iris project completed except for the fuzzy yellow beard. That will stay unfinished until everything else is done as it will be the final step. As you can see from the pictures, I have made a lot of progress and am fairly pleased so far. I will be happier when more detail gets added but I AM pretty happy with the big purpley petal in the foreground. I really was just lucky with the fabrics I had. I am especially pleased with the look of the highlighting on the blue bloom on that petal.


Here is my original photo divided up into components and numbered to keep them straight


And here is my pattern drawn and enlarged by the printer

Here I have taped my muslin base in place and I will sketch my main sections. Sadly, I forgot to use a pencil instead of a dead marker so some of my guidelines show through , especially on lighter coloured areas. Pretty sure I can detract from that with stitching and some other little tricks!
There we are! Some of my guidelines sketched in 
Some of my base pieces added
Auditioning fabrics for the top right hand corner
Top right hand corner added and some detail in place
This picture is a funny colour because I stopped the camera down to use a flash. The flash washed the colours out but I hope the foreground petal shows up well enough. I am smiling about it :-) It will not change much from now till the piece is finished but the rest will morph quite a bit over the next few days.
Well, folks, it is a start but there is a LONG way to go yet. I am fired up now! Christmas, birthday all shaken out of my head and now it is full of fabrics and batting and machine quilting. There is a big spot in there for my darling kids who came home last weekend and a little spot where nasty cold weather is lurking too. Hope you are all warm, dry and being creative!

At LONG last!!!

A NEW project. I am still plugging away on the Layers piece slowly but needed a new piece to get me rolling again after Christmas and all that it entails. I am TIRED! My 70th birthday really hit home and today, I feel every single year. Never mind. I am well, happy and HERE! What more could one ask? Thank God for all of His mercies.

We had a lovely visit with our daughter and son in law this past weekend and had a wee party for them in our tiny house. It was like a church meeting here, chairs lined up in rows in the living room:-) Maybe I should have taken a collection! Guess I missed my chance. Anyway, we DID enjoy it. They came home for my 70th birthday, very very much appreciated as it is a 16 hour drive from their house to ours.

Now to this new project. I believe I HAVE shown you the photo before  but just in case- here it is. It is a very close up centre of a spectacular red and purple iris taken by me at the Royal Botanical Gardens a few years ago. I am aiming for a sort of Georgia O'Keefe effect only not so huge as her work. It will be about 24" x30", more if I decide to border it.
I have begun to choose fabrics and to see which ones I still need to dye more of. More yellows , more lighter values and more very deep purply blue for the veins.
I have further cropped the photo as I want the nicely abstracted centre of the flower for my subject. Talk about "up close and personal"!
There , you get the idea of size as it is all sitting on my big gridded cutting board, one inch squares. I will dye a bit more fabric today and then get a start. I cannot wait! I have been chomping at the bit to get creative again. Sitting about is NOT my bag. I hope to post this on the needleandthreadnetwork.blogspot.com

Little addition- I have eight fat quarters batching as well as a metre of intense blue/purple on the floor in the living room. Wish me luck!
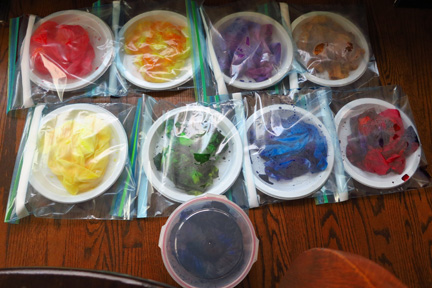
All Ziplocked on plates waiting to get nicely soaked in and melded together. Stay tuned, folks!

New ideas

As I have been going through photos stored on my external Hard Drives, I have come across some dandies! I found this stunning red Iris that I took at the Royal Botanical Gardens one evening several years ago. I played around with the original picture in Photoshop and came up with a few crops that have now gone into my For Quilting file! It is a VERY full file! I think it could be fabulous- maybe not too huge , say 24 inches - 30 inches square ? Could be very Georgia O'Keefe! Watch out when the Layered one is finished- or nearing finished :-)


The original photo judiciously cropped to get rid of extra background


"Closer to" as my Gran used to say


I like this one a  LOT!
Like I said, keep watching this space. I need to replenish my stores of hand dyes. Reds and purples and yellows would be nice!
Here is Layers so far. Those of you who are trained to observe ( :-) ) will see that some chunks have been removed and replaced and some have been added to. More to do!


Background Information

This took me a long time! I tried it on black and it was fine , but not cool. So, I tried hand dyes and chose this one. I see leaves and organic shapes so I thought it "said something". It is now fused in place and a few bits of the red painted Reemay to suggest more leaves . Now- I start to stitch, and stitch --- and STITCH! I am linking it to the needleandthreadnetwork.blogspot.com

Decision made

Well, I have finally chosen a background fabric for the Coleus Project. It is one of my hand dyes , chosen after having bought some black cotton AND , having dyed a dark mottled piece in colours I THOUGHT would work. They did NOT - but I have a great piece of dark fabric for another project ;-) DH says this piece works well and he is my best advisor.

There is still a lot to do to this so it is not fused down yet. This will be a busy week so I am not sure when it will get done but I HOPE to get some work done on it soon. My classes start this week so - gotta concentrate on that . (BTW, the orange dot in the top left of this photo is a pin head, NOT part of the design!)

Making good progress

I had a busy night last night. I managed to start the fill-in process and finished it this morning- at least on the main piece. I dyed some really nice antique mustardy greeny gold pieces yesterday- and they were too blah! Great colours but they may get overdyed to spice them up! In the end, I used pieces from my hand dyed stash to better effect- or I think so anyway. Here are a few pictures of the process to date. I have lots of touchup I want to do once the main piece is completed. There need to be some shadows and highlights to lift and separate the leaves from each other. Sounds like that old bra ad from years ago! " Suddenly, you're shaplier!" Way to go ;-)
Sorry about the mess! I was working on my acrylic painting sheet on top of the light box so all of my housekeeping sins are obvious :-(

Front side of the previous picture. The long stringy bit on the lower right is another piece that I may add later.

And here is the partly filled main piece on my black display board. What am I going to do for a background? The black is dramatic for sure, but so predictable! Hmmm!!


And, finally, the whole piece filled and ready for the details and the extra little bits to be added. Still no idea what to use for background.