


Here is most of the little red landscape sample I am making just now. I have photographed it as I have gone along and will explain the process using those pictures but I thought you should have some idea where this is going. Eventually, there will be a silhouetted tree in the corner and a blazing bit of the sun showing too just before it drops below the horizon. Those bits will be fused applique so not necessary right here, right now.
 |
| Here is my pattern drawn out onto freezer paper, pieces all numbered and the registration lines( red marks) all in place. Copy this onto a piece of muslin big enough to cover the back of your quilt and also a piece of tearaway stabilizer. Layer as follows from bottom to top- tearaway stabilizer,then the muslin and then your fabric pieces on the top. Line up all of the drawn guidelines using a lightbox or a window with light shining through and pin your corners securely. |
 |
| Here are the fabrics I have chosen for my sky set out in order. I need five strips to do this sky plus a scrap for my sun. |
 |
| Here , I have numbered all of the strips in order from the top to the bottom of the pattern close paying attention to which layer is the furthest back and then which will go on top of that piece- and so on. I have cut out my freezer paper pattern with the numbers on each piece and , although I did not show it here, the registration marks should be made at this point too so it can all go back together again properly when it is time. Registration marks will be shown in a few more pictures. |
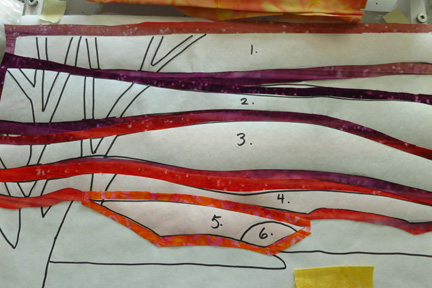 |
| Just double check the order of the pieces and check the colours too . In the end, I changed some of the colours and fabrics I used . Do not let that comfuse you. |
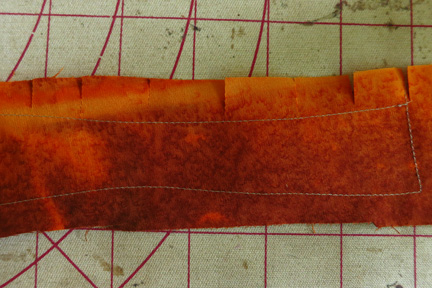 | |
| Now, not a pretty picture but important. EVERY piece that will be used with a turned edge MUST be staystitched all around it. Staystitch using a short stitch length in a colour that contrasts well with the fabric you are using. The staystitching does four things-it stabilizes your odd shaped pieces of fabric, it gives you a cutting line to guide you as you clip your curves( more in a minute) , it gives you a guide line for the folding over of the raw, clipped edges and lastly, the seam allowance on the lower side will also have a line of stitching to help you place the next piece and you must cover the stitching of the previous piece with the folded edge of the new piece. |
 |
| Your staystitching should be evenly spaced all round each piece at a distance of about 1/16 inch from the edge of the freezer paper pattern. On the TOP edge of each piece, CLIP the curves by clipping TO but NOT THROUGH the stitching. |

 |
| Once the edges are clipped - REMEMBER, ONLY THE EDGE THAT WILL BE FOLDED NEEDS TO BE CLIPPED. DO NOT CLIP THE SEAM ALOWANCE EDGE- using a hot, dry iron, carefully fold the clipped edge over so that you can see the stitching line and press very flat. If need be, use spray starch or even just a bit of water to get a clean edge. |
 |
| Note that where you are clipping into a CONCAVE edge, just clip but if it is a CONVEX edge, take a V shaped nip out, other wise when you fold , the little fabric tabs will overlap and make a bulky edge. NB, the darker brown piece numbered 8and the orangey gold piece a few pictures above here. They both show those nips removed. |
 |
| Now all of the sky edges are turned so I have turned them right side up and put them in order. Note how the top edge is folded over and the bottom edge has the free seam allowance . ALL EXCEPT piece number 1! It has just been stitched all round because nothing needs turning. The bottom edge will have piece #2 attached and the top edge will form the bit that your border will be sewn onto. |
 |
| At this point, move the pieces together, matching the little red registration marks so they fit together properly. I use a light box as well or you could put the pieces up against a window so you could see through pattern and fabric. |
 |
| All pinned just to check the clours - I will not use this yellow for my sun- stay tuned! Now I will pin the pieces onto my muslin and tearaway stabilizer and then stitch them into place. I use INVISIBLE thread in the needle and Superior's Bottom Line( very fine thread- ANY fine thread will do) in the bobbin. I lower my bottom tension a lot so I get no "pokies" showing through to the top.The stitch I use is a Blind Hem stitch, narrow stitch width, short stitch length. |
 |
| This is the back side of my work showing the drawn lines and the blind hem stitches coming through where I sewed my sky pieces in place from the front |
 |
| And here is the sky on the right side, all nicely sewn in place and pressed |
 |
| Closeup of the blind hem stitch along the top edge of this red piece with the seam allowance left free for putting the next layer on. |
 |
| This is the top right corner . NB, Do NOT turn the top edge . You want it free for trimming and for attaching borders or binding later. See how nice it is to have that guideline stitched in place! |
 |
| I made all of my hill pieces but had second thoughts about size and colour of some. |
 |
| Tried again, changed some colours and eventually the size of the two big foreground hills. That sun piece is just sitting there. I will move it to the left and make it a different colour. The sun and the tree and a few little highlights on the water will all be fused later. I will quilt this much first , then fuse the rest of the detail, stitch and quilt them too eventually. |
 |
| To make the tree, I recopied just the tree shape onto a scrap of freezer paper and ironed it onto a piece of dark batik I already fused to some Wonder Under , then cut it out . |
 |
| The freezer paper has been removed |
 |
| I flipped it to show the back side with Wonder Under on with the paper still left in place so it is not sticky. |
 | ||
| And here is a very rough idea of what the final piece will be like. By the way, when I placed the water, I lifted up the lower edges of the red and the goldy hills and tucked the water underneath and I placed the purply foreground on TOP of the water. Think about it. The land appears to sit ON the water( even though it just pokes through it) so it looks better if you watch where and how you place certain folded edges. |
This has been a long winded post but I have had so many questions that I did want to try to answer them as best I could. Like I said, if you could see my hands, it would be MUCH clearer :-) Let me know if there are gaps or questions and I will amend as needed.


