Powered By Blogger

Convergence Quilt samples

Chrysanthemum convergence, all ready to layer and quilt.

Bright Convergence needing interesting borders now.
I have been playing in the sandbox! I have made a couple of Covergence quilts , one of which is now ready to layer and quilt. These are for teaching samples for a beginner convergence quilt class being offered where I teach. Convergence is a really easy technique but you can quickly make something that LOOKS difficult. If you choose your fabrics carefully, cut and sew accurately, the finished product can look quite impressive. It is a fun project for someone who is not brave about sewing intricate blocks yet. However, a lot can be learned about making intricate blocks from this technique. Give it a try . Have a look at Ricky Timms book, "Convergence Quilts.

I am posting this on needleandthreadnetwork.blogspot.com  Join in and see some really great work by a number of Canadian Quilters.

World Inchies

As Robbie Burns said in his poem, To a Louse,

 " O wad some Power the giftie gie us
    To see oursels as ithers see us"

Well, I guess on this day, it was NASA that gave us that power, so here we are- as others may see us. Let us behave, just in case!
My one and only this week- MY WORLD Inchie

Urban Cubes

Named by my DH because he thought this reminded him of Expo 67 Habitat for Humanity, these are little quilts designed by me using the various hollow cubes from the lovely book, One Block Wonders Encore by Maxine Rosenthal and Joy Pelzmann. They are REALLY fun to do and men seem to LOVE them. Must be the 3D look!I have taught this class a zillion times and am set to do so once more this fall. I am very glad I enjoy doing  it :-) I am surprised that I have never posted these photos before . I have done several of these quilts in various configurations, all enjoyable to do and to look at. Anyway, here they are , two of them at least, for your continued dining pleasure!
This is the first one I did. It is now in the collection of my daughter and son in law. DH got all bent out of shape then because HE did not have one so I made him one too but do not have a picture.
Here is a crooked picture of the sample I did for the class. This is what we will be building together. Great fun to do. Have a look at the series of One Block Wonder books. They are great!


Online arm twisted!


I emailed my friend, Jindra Katzerova in Czech Republic to tell her that I had posted a picture of her bag and directed her to check out your comments. She was very pleased so I pushed my luck and asked her if she would send photos of the prizewinning quilt to me to post. She did- and here it is. She calls it "Debut". It is a multi media piece with painted , burned Lutradur. I think it is spectacular as did the judges at the Prague show where she won first prize and a new Bernina sewing machine. Judge for yourself....
Debut by Jindra Katzerova, Czech Republic
Here are a few detail shots of the piece, close up.
The painted , burned Lutradur, cut with a soldering iron

closeup of the painting and quilting

more of the quilting

and a wee bit more of the background quilting

A lovely surprise

Today, the postman brought me a lovely surprise from the Czech Republic. A few months ago I "met" a lovely woman from Czech Republic through Betty Busby, American Fibre Artists par excellence. If you do not know Betty's work, google her name. You are in for a treat! Betty had kindly replied to some of my queries on Reemay( see my Reemay posts) and eventually, she put my friend and me in touch with each other as she thought we would have a lot in common. We do! I have not asked my friend's permission to post this gift on my blog but I shall and I do that . I think you will be impressed by her work.

Sometimes I think North Americans think that this is the centre of the universe. Not so! All sorts of marvellous things are going on everywhere. My friend in CR made me this wee bag as a thank you gift for some materials I sent her. She cannot get anything but the bare essentials for quilting apparently and what she can get is very expensive. She got hold of some Lutradur and painted and stitched it into a gorgeous wall quilt which won first prize at a big quilt show in Prague- and won a new Bernina sewing machine ! With her new machine and a LOT of talent and not much material, look what she has created. It is tough to say but I THINK it has some painted Lutradur on top of gold satin on top of a cotton print. This bag is beautifully made - perfectly precise and so very elegant. Inside is a little pouch with a velcro closing that would hold a credit card and ID. All in all, a lovely gift and so very much appreciated. Enjoy the pictures and I will enjoy the little purse.

The front of the purse
The back

The painted Lutradur panel on the front

Detait of the painted panel
I am posting this on the needleandthreadnetwork.blogspot.com

Eye Inchies

They say that the eyes are the windows to the soul. What do you think of MY soul? Maybe you should look at MY OWN eyes, rather than these Inchies before answering that question ;-)
Pretty straight forward- a nice green eye. Does this REALLY represent jealousy?
Potatoes have eyes , but cannot see

Hurricanes have eyes and they seem to see really well! Look at the stats. They head right for the worst possible places, the spots where the most damage can be inflicted on the folks least able to cope with that damage!

Needles have eyes - and sometimes they have a long line of camels waiting to get through !
There is always the Evil Eye- and the Turkish talisman to protect us from it
...and last, but not least, that very modern eye- or "i"- the iPod!
Keep your eyes open and for a feast for the eyes, go to everyinchiemonday2012.blogspot.com
Hope we have better participation this week. Maybe you are all on holidays?

Haze Kilim

This is a Kaffe Fassett design I started a year or more ago and a couple of days ago, in a "finish the darned things" frenzy, I pulled it out and started to sew . I had three strips done out of eight and this was  the fourth. I sewed away till it was ALMOST finished but when I tried it against the rest of the quilt top, it was all out of whack !!!! Grrrr!! I was ripping cross at myself. I DID rip! I picked it all apart patiently, murmling under my breath, and it is all together now again and attached to the third strip so now I am HALF FINISHED! Yay! Just thought I would post what it looks like so far. When it is finished, it is to be 72" square. Wait till you see the backing fabric! DEE-Licious!!!
The colours here are a bit wilder than it really is and it looks crooked because it is draped all over the sofa. It IS actually straight! Now that you see it, you can see how much picking out I did!! Poor old me:-( BTW, the pattern is from Kaffe's new-ish book, Simple Shapes, Spectacular Quilts. LOVE that book as much as I love his Glorious Inspirations , which I own in Hard Cover, and Kaffe signed it for me when I took a needlepoint workshop with him in Toronto years ago.Lucky me! That book has appreciated in value a LOT since I bought it.

backing the Cinnamon and Ginger

I have finally finished the backing for the Cinnamon and Ginger quilt and the whole thing is now away for quilting. The backing was too narrow for the 90 inch square quilt so I made it wider , as you can see.
This  is the backing fabric, Kaffe Fassett's Suzani Embroidery. I LOVE it!
I made eight of these log cabin blocks plus two made with just strips, sewn vertically . There is one for each end of the backing so that when it finally gets trimmed off, only the top or bottom of a stripe will be lost, not part of a block! Clever old bag of chips, aren't I ;-)
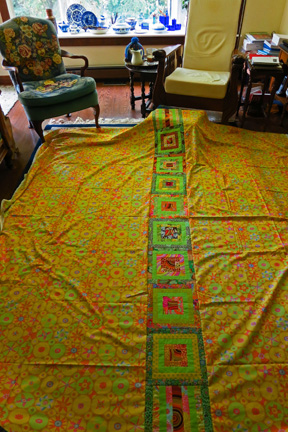
This is a bit hard to see . The piece is big , the room is small and the light was poor. You get the idea anyway. 
Today, I am in a MESS! I am finishing yet another UFO but it has been a year since I touched it. It is all cut out and nicely labelled , BUT my perceptions were a tad wonky yesterday and I have made almost one whole pieced strip- INCORRECTLY! Remember me in your prayers, please as I rip seams and redo :-( I am linking to needleandthreadnetwork.blogspot.com where you can see all sorts of lovely things, and where I hope I will get LOTS os sympathy! That current quilt , by the way, is a Fassett quilt too called Haze Kilim. Gorgeous. Maybe you will see it next week!

House Inchies

A man's CASTLE is his home- fortified with a moat!

That Litte Grass Shack in Hawaii!- or somewhere warm!

There are strange things done in the Midnight sun- in Ice houses!

And the Plains Indians made beautiful, portable round houses.

   
Not a hive for the buzzing bees but a home for many birds!
Everyone gotta live SOMEWHERE! Here are a few houses- of sorts!


...and , if you put them all together...

..you get a community!
I am linking these to the everyinchiemonday2012.blogspot.com site. Join us for lots of great HOUSE Inchies. Enjoy :-)

A work LONG in progress!

Many moons ago , I made a quilt top from a pattern by Lori Allison called Cinnamon and Ginger. I do not do many bed quilts any more and rarely use patterns but I loved this one. It is 89.5inches square the way I made it so it would cover our Queen sized bed with its extra deep mattress. Instead of making the fabric for the corners of the blocks dark as in the pattern, I used a pale limey green to work better in our pale green bedroom. I bought five metres of Kaffe Fassett fabric for my backing but today, when I took it to Lucy the Marvellous Longarm Lady for quilting, I decided it was not enough material to do the back side! SO... Lucy and I both came up with the same solution- make a strip to widen it. Clever little things, aren't we! I started making some ten inch square blocks , sort of a log cabin block and have two of ten done and trimmed to 10.5 inches. This will give Lucy plenty of width to play with and me , an interesting quilt back. I am using KF's Targets fabric for the centres of my "cabins" and will use one round of the limey green in each block , varying their placement so each block is truly unique. Did you know that I LOVE Kaffe Fassett fabrics?? I do!
Here is the bed with the quilt top on it. The colours are more intense than this shows

This is my backing, Kaffe Fassett's "Suzani"

...and here are the first two of ten blocks to widen my backing
As this really IS a WIP, I am going to post this on the needleandthreadnetwork.blogspot.com  Drop in there and prepare to be amazed!

Ceiling Inchies!

 I WAS going to try to use my real ceiling as a sad Inchie but could just not get around to doing it well. A couple of years ago , we had a serious roof leak in the winter from ice dams and the leak was right over my laptop and the pretty Chinese rug in the sitting room. Both survived :-) Eventually, we had to have the back half of the roof rebuilt and are now waiting for a good drywaller to come and repair this horrible ceiling. Are you sorry for me? I am !! And, so... Ceiling Inchies. Not much imagination or skill here I am afraid this week. I even forgot yesterday was Sunday because I was so busy , but here they are ....
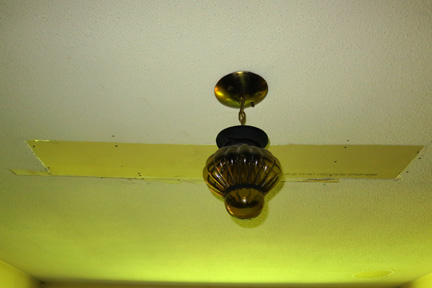
Fancy plasterwork...

...and not SO fancy plasterwork.
Our ceilings are MUCH more akin to number two!

All done but hanging sleeve and the binding

This colo


Make yourself a cuppa...


I promised to do this and so here goes. I have been asked by several people emailing me to please demonstrate the procedure for turned edge applique. I will try to be as clear as possible but as I cannot use my hands- only words and photos... If you have any questions, just ask.

 Here is most of the little red landscape sample I am making just now. I have photographed it as I have gone along and will explain the process using those pictures but I thought you should have some idea where this is going. Eventually, there will be a silhouetted tree in the corner and a blazing bit of the sun showing too just before it drops below the horizon. Those bits will be fused applique so not necessary right here, right now.

Here is my pattern drawn out onto freezer paper, pieces all numbered and the registration lines( red marks) all in place. Copy this onto a piece of muslin big enough to cover the back of your quilt and also a piece of tearaway stabilizer. Layer as follows from bottom to top- tearaway stabilizer,then the muslin and then your fabric pieces on the top. Line up all of the drawn guidelines using a lightbox or a window with light shining through and pin your corners securely.


Here are the fabrics I have chosen for my sky set out in order. I need five strips to do this sky plus a scrap for my sun.

Here , I have numbered all of the strips in order from the top to the bottom of the pattern close paying attention to which layer is the furthest back and then which will go on top of that piece- and so on. I have cut out my freezer paper pattern with the numbers on each piece and , although I did not show it here, the registration marks should be made at this point too so it can all go back together again properly when it is time. Registration marks will be shown in a few more pictures.
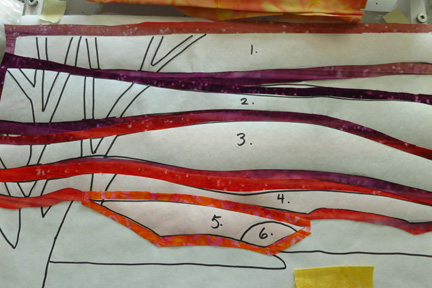
Just double check the order of the pieces and check the colours too . In the end, I changed some of the colours and fabrics I used . Do not let that comfuse you.
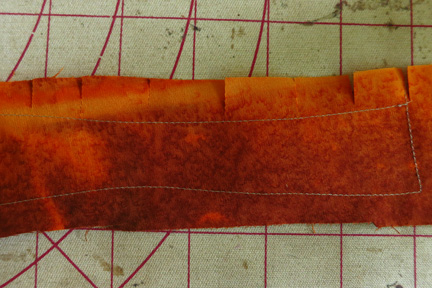
Now, not a pretty picture but important. EVERY piece that will be used with a turned edge MUST be staystitched all around it. Staystitch using a short stitch length in a colour that contrasts well with the fabric you are using. The staystitching does four things-it stabilizes your odd shaped pieces of fabric, it gives you a cutting line to guide you as you clip your curves( more in a minute) , it gives you a guide line for the folding over of the raw, clipped edges and lastly, the seam allowance on the lower side will also have a line of stitching to help you place the next piece and you must cover the stitching of the previous piece with the folded edge of the new piece.

Your staystitching should be evenly spaced all round each piece at a distance of about 1/16 inch from the edge of the freezer paper pattern. On the TOP edge of each piece, CLIP the curves by clipping TO but NOT THROUGH the stitching.

Once the edges are clipped - REMEMBER, ONLY THE EDGE THAT WILL BE FOLDED NEEDS TO BE CLIPPED. DO NOT CLIP THE SEAM ALOWANCE EDGE- using a hot, dry iron, carefully fold the clipped edge over so that you can see the stitching line and press very flat. If need be, use spray starch or even just a bit of water to get a clean edge.

Note that where you are clipping into a CONCAVE edge, just clip but if it is a CONVEX edge, take a V shaped nip out, other wise when you fold , the little fabric tabs will overlap and make a bulky edge. NB, the darker brown piece numbered 8and the orangey gold piece  a few pictures above here. They both show those nips removed.

Now all of the sky edges are turned so I have turned them right side up and put them in order. Note how the top edge is folded over and the bottom edge has the free seam allowance . ALL EXCEPT piece number 1! It has just been stitched all round because nothing needs turning. The bottom edge will have piece #2 attached and the top edge will form the bit that your border will be sewn onto.
At this point, move the pieces together, matching the little red registration marks so they fit together properly. I use a light box as well or you could put the pieces up against a window so you could see through pattern and fabric.


All pinned just to check the clours - I will not use this yellow for my sun- stay tuned! Now I will pin the pieces onto my muslin and tearaway stabilizer and then stitch them into place. I use INVISIBLE thread in the needle and Superior's Bottom Line( very fine thread- ANY fine thread will do) in the bobbin.  I lower my bottom tension a lot so I get no "pokies" showing through to the top.The stitch I use is a Blind Hem stitch, narrow stitch width, short stitch length.

This is the back side of my work showing the drawn lines and the blind hem stitches coming through where I sewed my sky pieces in place from the front

And here is the sky on the right side, all nicely sewn in place and pressed

Closeup of the blind hem stitch along the top edge of this red piece with the seam allowance left free for putting the next layer on.

This is the top right corner . NB, Do NOT turn the top edge . You want it free for trimming and for attaching borders or binding later. See how nice it is to have that guideline stitched in place!

I made all of my hill pieces but had second thoughts about size and colour of some.

Tried again, changed some colours and eventually the size of the two big foreground hills. That sun piece is just sitting there. I will move it to the left and make it a different colour. The sun and the tree and a few little highlights on the water will all be fused later. I will quilt this much first , then fuse the rest of the detail, stitch and quilt them too eventually.

To make the tree, I recopied just the tree shape onto a scrap of freezer paper and ironed it onto a piece of dark batik I already fused to some Wonder Under , then cut it out  .

The freezer paper has been removed
I flipped it to show the back side with Wonder Under on with  the paper still left in place so it is not sticky.

And here is a very rough idea of what the final piece will be like. By the way, when I placed the water, I lifted up the lower edges of the red and the goldy hills and tucked the water underneath and I placed the purply foreground on TOP of the water. Think about it. The land appears to sit ON the water( even though it just pokes through it) so it looks better if you watch where and how you place certain folded edges. 

This has been a long winded post but I have had so many questions that I did want to try to answer them as best I could. Like I said, if you could see my hands, it would be MUCH clearer :-) Let me know if there are gaps or questions and I will amend as needed.