Powered By Blogger

Zentangle piece

Silk for the reemay. Wish I had intensified the blue.

The reemay just sitting on top of the silk. Love the colours so far.
Well, I have painted a piece of silk for the background and fused the reemay to it . So far, so good. Now, I am sitting, staring at this trying to decide where I want to go from here??? Do I want to cut the centre out and fuse it to a backing or do I want to keep this whole thing intact and border it with something? I have it sitting on a piece of batting and am tempted to quilt it soon . Maybe that would help me decide. What to do? What to do??
The two parts fused together. This is pretty light weight Habotai silk( 12mm). Maybe Dupioni or a heavier Habotai would have been more stable. I just got a piece of 16mm today . It has nice heft so prehaps it would not have wrinkled like this has . Not a major problem, but it bugs me a little. However, once it is stitched and quilted I am sure it will be fine.I used Trans Web on the back of the reemay. Not sure I love that product!
             I have posted this on The Needle and Thread Network.Click on the link on the sidebar.

Redo

I decided, after much anguish, that I did NOT like the way I had finished the Urchin, so, one last time, here he is FINISHED!! No more tweaks. I am done!  Fini!
Remounted and FINI
I also added some little metal beads to the bare, empty spots to suggest sand grains. These are gorgeous little beads, faceted pewtery coloured and very sparkly in a delicate sort of way, given to me by a very kind friend!
Little metal faceted beads added to the bare spots and out onto the binding

Bottom left hand corner
I am a MUCH happier camper :-)

Step Inchies

"One small step for a man. One giant leap for mankind!" Remember that? Neil Armstrong stepped onto the moon for the very first time and we all watched- MILLIONS of us. Then, eons ago, a single humanoid ancestor strolled along a muddy stream bank and left an imprint there for all time when the mud dried and the print became fossilized. He left us a tiny peek into his barefoot world. We walk alone. We walk with friends. We are constantly climbing the steps of the ladder to success- or trying to. Take care where you step because your steps may be indelible and not all marked trails lead to happy endings.
One small step for a man. One giant leap for mankind.
Fossilized footprint of an early human ancestor
In our life, we really always walk alone

How lovely to walk with a little friend though!
On our climb up the ladder of success, be careful where and how you step. We will ALL be watching.

                                                      *PLEASE WATCH YOUR STEP*

Zentangle piece

I am having a ball with Zentangles and have cut this piece of painted reemay that makes me think of some of the Tangles I have been making lately. This is NOT the background but I needed something to show up the cut out reemay piece. This is moving right along but I need to make a background for it. That will take some time .I also hope to make the crossing Tangle lines go over and under each other . I am thinking I could use a marker to do some interesting shading. We shall see. Drop in from time to time and see how it goes.

I am still debating about removing the background of the Sea Urchin. I am not totally pleased with it. Maybe I will just finish the Urchin himself. Once again, stay tuned - and prepare to be amazed..... or not ?

A new experiment


My original drawing coloured with pencil crayons
I am at it again ! Still playing with reemay. This time, I have actually followed the directions given by Betty Busby. I painted the reemay, ironed it to shrink it slightly then fused Trans Web onto the back side of it. That part is now set aside while I transfer my drawing onto the back of the reemay using my light table. Once that is done, the reemay will be pinned back onto the little wooden frame for burning. I plan to burn it so that the lines end up a  bit wider than they are in the coloured drawing. I want the intricacy of the drawn shape but more reemay to show off the colour transitions. Wish me luck. I am also trying to shake out of the conservative use of colour that seems to be me at the moment! I have said before that I am a colour junkie, but lately, you would never know it. Maybe I am in my pastel period!!
Black and white , enlarged photocopy of my drawing

The painted reemay
Wish me luck.

All done at last

The colour on this is a little bit off because it is taken indoors in the evening. If I can get truer colour tomorrow, I will change the photo. I guess I like it alright. I wish I had had a different fabric for the background but this is another piece of the same fabric as the backing for the Reemay , even though it looks different here. It is nice and chalky looking, very fossil-like which I like but maybe did not QUITE do what I was wanting it to do. On the whole though, I am happy.

Nearing finished

The beading is all done now

A few closer looks at the detail


Still raggedy edges but now it wants to be bound and mounted nicely
I THINK I am going to put the whole thing on another piece of fabric with batting. It has been a proper WIP as I have kind of had to make it up as I go. I DO know what I want and where I want to go, but I am still altering as I go along. Maybe it will be done by tomorrow ?
I am linked to the Needle and Thread Network with this one.

Friend Inchies

A friend makes us smile

A friend is always there for us

Friends share a cuppa and comiserate or celebrate - or just share a cuppa

Friends care and help

Kudos and bouquets to our friends everywhere
Friends! We love our friends. Some of us cannot bear to be parted from them and we spend all day on Twitter and Facebook and phones keeping in touch. Others just know that a friend is ALWAYS available for a cry, a laugh, a rant, a celebration or just a hot cup of tea or coffee. We trust our friends. We rely on them.We would help them in any way we could and we know they would reciprocate. We should give our friends a hug and thank them more often- just for being there! Love you all :-)

And still that Urchin

I have chosen a background from my hand dyed fabrics. I have decided on a treatment for the "holes" and I have done the stitching, and attached the background and the urchin mask and now, am working on beading the almost finished piece. Some photos of the continuing process.....
This looks messy but I was working out what I wanted to do with the "holes".

Chose a background fabric
The background fabric. I was planning to dye some silk for this but liked this piece. The fillins for the holes have been free motion stitched.


Mask and background attached to each other and free motion stitched

Detail of the stitching. I really like the fly stitch along the ribs. Stroke of genius!

This should be called "the story so far" but I am actually well past this - no pictures yet!

Urchin continuing

The piece of cotton I dyed. I like the colour intensity and am going to iron the cotton and try to find the perfect place on the cotton to use for my background. I do like the gradation of colour!

Same thing, different shot .
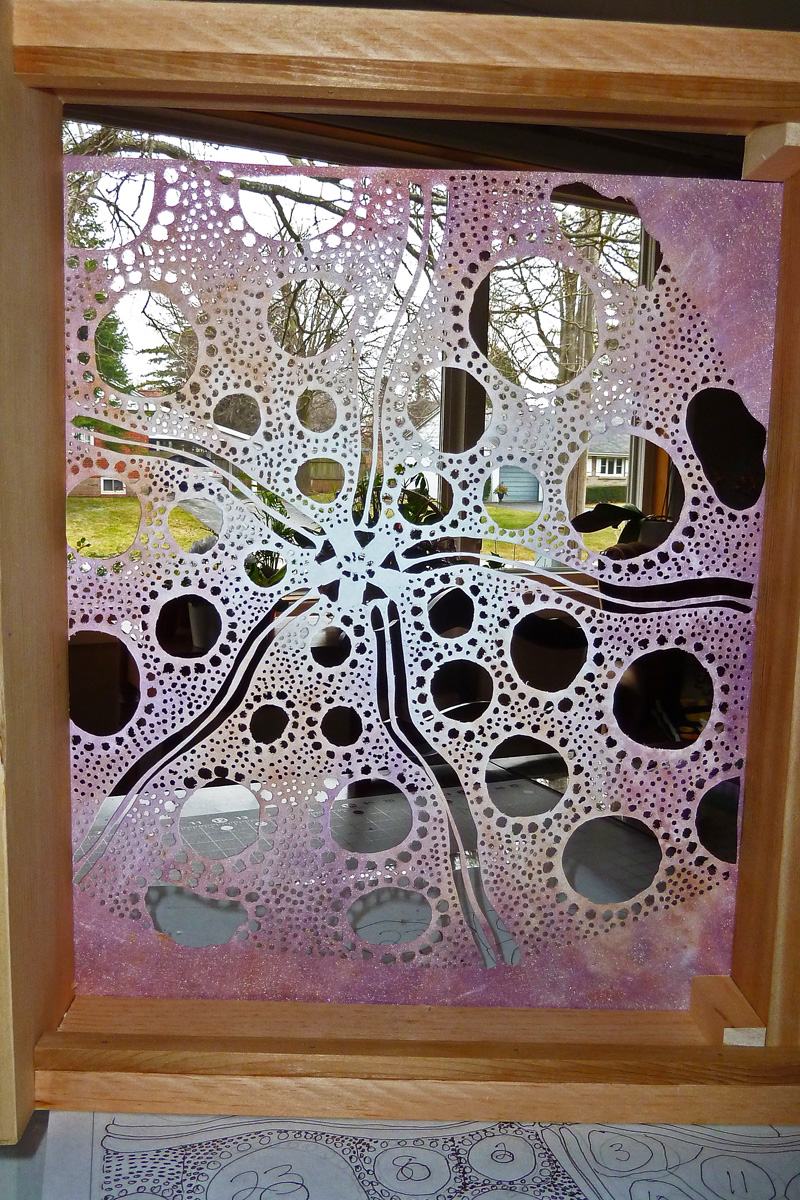
I am finished all of the burning and cutting and now need to decide where to go and what I want from here. The little centres of the spots where the spines attach on the urchin are so beautiful and I want that 3D , textured look. What colour should the background be? I had thought of using some silk and dyeing it but I have a piece of nice fine cotton I did a couple of weeks ago that I kind of like. I want enough contrast behind the open holes to let them "talk". I DID try this on a piece of plain white Dupioni silk. Pretty, but it did not really say much. So, here is the tentative plan. Remember I said to stay tuned re: the centres of the holes? Well, I have been experimenting. I cut them smaller than they were when I removed them from the main piece, but now, I think I shall make them smaller again , just the very centre of each cut out hole and shade them with pencil crayon to make them more three dimensional. Before I attach them to the background, I plan to do some stitching in the holes to add texture and then attach the hole centres. Each little section has a wee hole right in the middle so when I am all done , I will add a bead to each centre. I have some gorgeous ones that are pinky, iridescent, goldy- perfect colour and large enough to make a little statement. That is the plan....Now, let us see how that goes. Here are a few trial pics to see what things look like so far.
Just playing around with pencil crayons to see what the finished piece may look like. The paper pattern  a little off now as I improvised in a few spots as I cut.I

Same as above but the mask has been shifted a little

More Reemay!

The start of a new project. This is a piece of Reemay painted with Setacolor and Lumiere paints.It takes a LONG time to dry so I did it before drawing the pattern I wanted.

My pattern drawn roughly with a little detail onto a piece of freezer paper

The pattern has been taped upside down onto my lovely light box and the light turned on


Now the Reemay has been turned upside down and taped onto the freezer paper and the lines traced.

Pattern all traced in a fine , permanent marker onto the Reemay. Now I am ready to burn the pattern into the Reemay.

Nice little "monoprint" on the Reemay. I saw it on my craft sheet when I lifted the wet Reemay so I just carefully dropped it back onto the blobs of paint and, voila! Love the effect , but , alas when I burn the pattern , much of it will be lost. I will remember how pretty it was though!

All of the little holes have been burned into the Reemay.

The right side has to be tidied up to get rid of the " hanging chads"! Remember them???

This is the wrong side all ready to burn the bigger bits.

Now, I numbered the holes on the pattern....

....and numbered the Reemay holes to match .( stay tuned!)

Starting to remove the bigger pieces.

All finished with the major burning/cutting.

Wrong side again, all done!

Well , folks, this has been a labour of love! That's a lotta burning! On the whole, I am pleased so far. "What the heck is it ?", I hear you cry! It is a fanciful rendering of the fossilized skeleton of an ancient echinoderm, a Sea Urchin!
Next step, dye and /or paint an under layer which I shall quilt before adding the Reemay layer back on top. Enough for one day, I think!