Powered By Blogger

Finally finished


Last night, I put the binding on the View From Clingman's Dome! No longer a WIP!! Yay! On the whole, I am pleased with it although the fabrics I had to work with did not give me the luminosity I was wanting. The limitations of commercial fabrics kind of held me down , however, if I had more time , I could likely have found better ones.
As you can see , the photo is a wee bit over exposed . The sun through the front window was wicked this morning!

And now, for the people who like to see the stitches.....
Invisible thread used here to quilt the sky.

The quilting on the mid ground trees is very random and I only stitched near the tops of the trees. All I wanted was a bit of relief and interest and texture, not detail.
 
Doing the grasses in the foreground is really fun! I love machine quilting and thread painting.
Finished at last and ready to start a more colourful and fanciful one now. As I do it, I will post a clearer description of the actual steps in the applique process - for turned applique.

I am posting the finished product on WIP Wednesday on The Needle and Thread Network. A new WIP is in progress but it is VERY WIP just now so not much to show.

Look a   needleandthreadnetwork.blogspot.ca  Lots of interesting things to see and to read about there. Come and join us!

Tourist Inchies

LOVE travelling! We are just home from three weeks in Britain - England and Scotland, chasing up family. It was pretty cold and quite rainy but we did have a grand time . We spent a LOT of time visiting, enjoying endless pots of tea and delicious scones, cakes and other treats. So much for my waistline- but it was SO VERY worth every pound to see the places our ancestors came from and to meet descendants of our families.


There are so many places to see and we travel for so many different reasons. I enjoy the people, the history and the landscape . Those are the basis for so much of what I do. Travel recharges my artistic battery!

Some of you may recognize the background of these Inchies as the Cumbria map from Bartholomew's Road Atlas of Britain. Ours is WELL used and I understand it is no longer being printed. We treasure ours! Go out and take a trip if you can, even locally. It will do you good!

I will be linked to Every Inchie Monday with these. Pay them a visit at everyinchiemonday2012.blogspot.com
and enjoy everyone's take on this week's theme.

Blind Hem or Applique Stitch


This is not a bad picture but when I explain, I think you will understand. The pale blue fabric was the first piece I attached to my quilt. The darker blue was added to it. As in the photos below, when we do this sort of applique, we add a nice seam allowance around the freezer paper pattern as we cut each section out. Then staystitch all round the piece about 1/16" away from the paper edge. BTW, I put my freezer paper on the TOP side of my fabric.

Then , I find the TOP edge of the piece I am going to attach to my last piece and I clip along the curved edge and then press the clipped edge over onto the back side of the piece so you can JUST see the paper pattern edge showing.Then, using the light box to line it all up properly, I pin the piece in place , removing the freezer paper first and being sure no staystitching shows either on the top piece or on the bottom one. Then , using a nice fine blind hem stitch or an applique stitch and INVISIBLE thread on the top( regular underneath is fine) , stitch the new piece to the old one JUST catching the new piece with the zigzag part of the stitch and letting the straight stitches follow the folded edge of the new piece, but do not let those straight stitches show on the surface of the new piece.


An applique or blind stitch is a combination stitch , several straight stitches and one tiny zigzag. Look it up in your machine manual. You want to have a short stitch length, I use .8, and a narrow width, I use 1.3. See the picture above. Even though it is a bit fuzzy, you can see the little zigzag but not the straight stitches. In the pictures below, you can see the seam allowance left on the new piece ready for the next bit to be attached along the staystitching line. I hope this clarifies the process for you. If not, say so and I shall reedit!

The next few steps

Well, I am making good progress on Clingman's Dome. I have used a tiny bit of old hand dyed fabric and it was coarse stuff to begin with so it does NOT want to lie flat. I think the quilting will cover a multitude of sins though. I shall post the photos and walk you through the process.
You can see faintly through the paper pattern the row of evergreens . The paper strip at the bottom is the interesting part of that layer, ie, the top edge, on freezer paper. NB the instructions to self- add 2.5 inches to the depth of this piece. I want the whole foreground covered by this fabric

Auditioning fabrics for the quilt.

The top three pieces have been cut from the freezer paper, identified, ironed onto the appropriate fabric, cut out with a healthy seam allowance (about 5/8 "). NB the little registration marks too

One piece with the staystitching showing on the overlapping bit and the seam allowance at the top turned over and stitched onto the piece above. I use invisible thread, an applique or blind stitch -.8mm length and 1.3mm width and JUST catch the folded edge with the zigzag part of the stitch, while the straight stitches get buried right tightly against the lower layer  but stitched into the upper piece. Let me know if this is unclear!

The batik fabric for the dead trees in the mid foreground

The Wonder Under ironed onto a piece of that batik and the pattern pieces marked, numbered and drawn onto the paper backing , ready to be cut apart

The quilt top on the light box so I can see where to place the trees. Note the seams . See the clips to make them turn nicely. I can easily see the drawn lines that show me where to put my trees .

First tree just testing the look before committing myself

The tree cut out and the paper backing removed ready to fuse

Back to the light box to be sure

Nicely fused in place.


The batik strip fused to Wonder Under to be used for the dead grasses in the foreground

First few bits of dead grass placed on the quilt top, prior to their being ironed down
I hope this is clear and helpful and encouraging . Try it. It is fun! Choose your fabrics carefully and you end up with a pretty realistic representation of your photo. This piece is almost ready to layer and quilt now. I have to finish the weeds and a few little details.

The View from Clingman's Dome

Several years ago, our daughter took us on a little tour of the Smoky Mountains, close to where she lives. It was cold up there and a tiny bit of snow lay on the ground in spots. I was very excited about the long vistas and took many photos. The receding hills fading into the distance absolutely enchanted me . This is one of my favourite shots. I love the contrast between the soft, delicate colours in the background and the raggedy weeds in the foreground against the stark skeletons of dead conifers.

I need a new landscape to use as a sample for a Landscape class I hope I will be teaching in the fall. This will be the project so I thought I would show you the process I use over several posts. This will be a combination of turned , stitched edge applique and fused. Hope you enjoy it!
Here , I have drawn my pattern on freezer paper and I have made a duplicate pattern to give to the printer for my class.As you see, it is very basic- not a lot of detail.

I will take the bottom off this big piece of paper and use it to make my pattern for the middle ground silhouette of the evergreens

There we are, all traced from my original drawing, note added to add 2.5 inches to that pattern piece .


The next step will be to number the pieces and choose fabrics. Watch this space!

               I am going to post this to The Needle and Thread Network , WIP Wednesday .               needleandthreadnetwork.blogspot.ca

Glass Inchies !!!!!

A badly drawn drinking glass

Glass is transparent- see!

Shades of the Lady of Shallot- the looking glass cracked from side to side! ( Does anyone else think this should not be spelled like an onion? I thought when I learned it, it was Chaillot???)
Holy smokes! Whose idea was THIS ? Sorry for a sort of lame excuse for a couple of inchies. I have had a busy week! Maybe next week I will be inspired .

Dolls- some original, some from patterns, all great fun to make!


My own Alice - with her second head and I am still not happy with it. We had a beheading last summer- grisly affair!

LOVED making these little leather shoes for Danielle-

Danielle, a pattern by Barbara Willis. Tres elegant , no?

My wee elf man. He does get about when you turn your back!

Love this little fellow. Painting the Roses Red- my own creation.

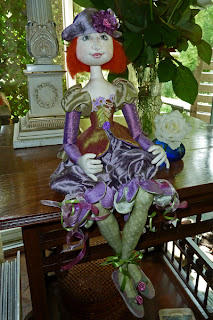
And another of my own, a fairy inspired by The Stratford(ON) Festival production of Iolanthe which had the fairies dressed as tarty Victorian Dance Hall Girls!


Still bootless Knave of Hearts. Guess who stole the tarts?

My first doll, Julie McCullough's pattern for the Mad Hatter. I gave him the armful of disembodied heads and call this picture" so hard to get ahead these days!" I was in a sillier than usual mood :-)

The Tweedle Twins. Took me a couple of runs befor I made what I wanted but I got them in the end.

Pretty gormless, eh!

The White Rabbit in his fuzzy bunny slippers which have pink bunny toes on the soles. His ears are droopy now so I have to fix him up.

The original Tweedles but I made them too small so I gave them fishing gear and a whole new can of worms!

Allison Marano's pattern for Henley, the House Elf. I used Deer Suede fabric- nice when you want lots of deep creases.


Allison's pattern but I added the divine bellybutton on Henley's tum! Some folks may with to avert their eyes!
I do like designing my own patterns for my dolls but some of the commercial patterns are TO DIE FOR!! The Frowning Francis ones REALLY tickle my fancy and I hope to do a couple more of the Steampunk ones. Check them out! These little souls live in our daughter's now deserted room and we do wonder what they get up to when the lights go out!


Here is the link for the                    needleandthreadnetwork.blogspot.ca


Enjoy!